
Source: https://developers.google.com/style/images \n\n# Diagrams, figures, and other images
  Stay organized with collections


  Save and categorize content based on your preferences.\n\n- Home\n- Products\n- Style\n\n\n## Page Summary\n\n- Images should only be used for visual UI elements or diagrams when necessary, and avoid using images for code, text or terminal output.\n- Prioritize accessibility by providing concise and descriptive alt text for all images, with longer descriptions in surrounding text for complex images; use empty alt text (alt="") for purely decorative images.\n- Introduce images with complete sentences ending with a colon or period for clarity and context.\n- Maintain image quality by using high-resolution images with the srcset attribute for high-DPI displays, and ensure images are appropriately sized for layout.\n- When creating images, use drawing tools for diagrams (SVG or PNG) and screen capture tools for screenshots, ensuring consistency and cropping to show relevant information only; use resource-efficient formats like MP4 for animations and videos.\n\nImages should only be used for visual UI elements or diagrams when necessary, and avoid using images for code, text or terminal output.\n\nPrioritize accessibility by providing concise and descriptive alt text for all images, with longer descriptions in surrounding text for complex images; use empty alt text (alt="") for purely decorative images.\n\nIntroduce images with complete sentences ending with a colon or period for clarity and context.\n\nMaintain image quality by using high-resolution images with the srcset attribute for high-DPI displays, and ensure images are appropriately sized for layout.\n\nWhen creating images, use drawing tools for diagrams (SVG or PNG) and screen capture tools for screenshots, ensuring consistency and cropping to show relevant information only; use resource-efficient formats like MP4 for animations and videos.\n\nUse images only when they provide useful visual explanations of information
that is otherwise difficult to express with words. For screenshots, be discreet. Only capture UIs that are important to the discussion.\n\n\n## Create and save images\n\nConsider the following guidelines for images:\n\n- To create a diagram, use any drawing tool.\n- To take a screenshot, use any screen capture tool.\n- Don’t use images of text, code samples, or terminal output. Use actual text.\n- For diagrams (architectural drawings, flow diagrams, and so on, as distinct from screenshots), use the following guidelines:\n- Use SVG files if possible because SVGs stay sharp when you zoom in on the image.\n- If you don’t have an SVG file, then save your image as a PNG file unless you have a good reason to use a different format.\n- Regardless of the format, don’t use a transparent background. In particular, a transparent background can cause issues if you use the Devsite lightbox widget.\n- For animations and videos, don’t use animated GIF. Instead, use a more resource-efficient format (such as MP4).\n- Be consistent for a given document or doc set in what operating system you use for screenshots—for example, take all screenshots on macOS or on Linux. Similarly, be consistent in how your screenshots look. If you take screenshots that include drop shadows of the main window, make sure that similar screenshots are consistent.\n- Crop screenshots to show the relevant information. For example, don’t include the full window if you just want to show a single button or menu item. Cropping helps the reader focus on the information that you want to convey in the screenshot, and it can help future-proof the screenshot if other parts of the UI change. Don’t include personally identifying information (PII) in screenshots. If a source screenshot includes PII, hide it with a solid-color overlay with 100% opacity. Don’t rely on blurs, mosaic effects, or similar image-processing effects to obscure PII; such effects can be reversed to reveal the original information. If you’re exporting an image to a format that can include information on separate layers (for example, PDF or TIFF), flatten the image on export.
Don’t use image maps. Instead, provide a list of text references following the image. Reasons to avoid image maps include the following:
Image maps are problematic for accessibility. Browser implementation for image maps varies, and image maps might not function correctly on mobile devices due to scaling. The technical complexity of creating and maintaining a coordinates overlay is often prohibitive. Use descriptive filenames for your image files. For more information, see Filenames and file types.\n- Don’t include personally identifying information (PII) in screenshots. If a source screenshot includes PII, hide it with a solid-color overlay with 100% opacity. Don’t rely on blurs, mosaic effects, or similar image-processing effects to obscure PII; such effects can be reversed to reveal the original information. If you’re exporting an image to a format that can include information on separate layers (for example, PDF or TIFF), flatten the image on export.\n- Don’t use image maps. Instead, provide a list of text references following the image. Reasons to avoid image maps include the following:\n- Image maps are problematic for accessibility.\n- Browser implementation for image maps varies, and image maps might not function correctly on mobile devices due to scaling.\n- The technical complexity of creating and maintaining a coordinates overlay is often prohibitive.\n- Use descriptive filenames for your image files. For more information, see Filenames and file types.\n\n- Use SVG files if possible because SVGs stay sharp when you zoom in on the image.\n- If you don’t have an SVG file, then save your image as a PNG file unless you have a good reason to use a different format.\n- Regardless of the format, don’t use a transparent background. In particular, a transparent background can cause issues if you use the Devsite lightbox widget.\n\nDon’t include personally identifying information (PII) in screenshots.\n\nIf a source screenshot includes PII, hide it with a solid-color overlay with 100% opacity. Don’t rely on blurs, mosaic effects, or similar image-processing effects to obscure PII; such effects can be reversed to reveal the original information.\n\nIf you’re exporting an image to a format that can include information on separate layers (for example, PDF or TIFF), flatten the image on export.\n\n- Image maps are problematic for accessibility.\n- Browser implementation for image maps varies, and image maps might not function correctly on mobile devices due to scaling.\n- The technical complexity of creating and maintaining a coordinates overlay is often prohibitive.\n- Use descriptive filenames for your image files. For more information, see Filenames and file types.\n\n\n## Text associated with images\n\nThere are differences between alt text, figure captions, and figure descriptions. Independently of these elements, an introductory sentence should precede most images. The sentence can end with a colon or a period; usually a colon if it immediately precedes the image, usually a period if there’s more material (such as a note paragraph) between the introduction and the image. Always introduce an image with a complete sentence. You don’t need to introduce screenshots that immediately follow procedural text that describes a UI.\n\n\n### Example\n\nThe following diagram shows how you can apply bounded contexts to an existing ecommerce application:\n\nIn figure 1, the ecommerce application’s capabilities are separated into bounded contexts and migrated to services as follows:\n\n- Order management and fulfillment capabilities are bound into the following categories:
The order management capability migrates to the order service. The logistics delivery management capability migrates to the delivery service. The inventory capability migrates to the inventory service.\n- The order management capability migrates to the order service.\n- The logistics delivery management capability migrates to the delivery service.\n- The inventory capability migrates to the inventory service.\n- Accounting capabilities are bound into a single category:
The consumer, sellers, and third-party capabilities are bound together and migrate to the account service.\n- The consumer, sellers, and third-party capabilities are bound together and migrate to the account service.\n\n- The order management capability migrates to the order service.\n- The logistics delivery management capability migrates to the delivery service.\n- The inventory capability migrates to the inventory service.\n\n- The consumer, sellers, and third-party capabilities are bound together and migrate to the account service.\n\n\n### HTML\n\n```\nThe following diagram shows how you can apply bounded contexts to an existing ecommerce application:
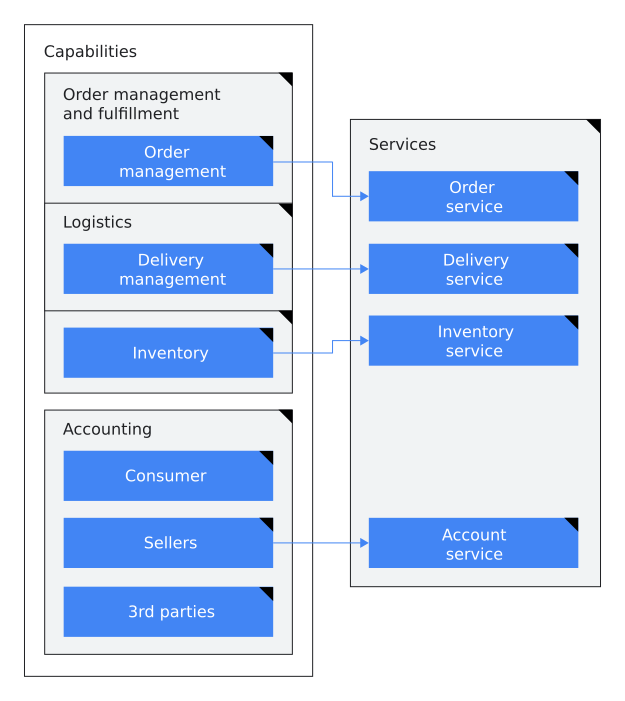
Figure 1. Application capabilities are separated into bounded contexts that migrate to services.
In figure 1, the ecommerce application’s capabilities are separated into bounded contexts and migrated to services as follows:
Order management and fulfillment capabilities are bound into the following categories:
- The order management capability migrates to the order service.
- The logistics delivery management capability migrates to the delivery service.
- The inventory capability migrates to the inventory service.
Accounting capabilities are bound into a single category:
- The consumer, sellers, and third-party capabilities are bound together and migrate to the account service.\n```\n\n\n### Alt text\n\nAlt text is a concise description of the image that can replace the image in situations where the image isn’t visible, such as people using screen readers, people using text-only browsers, or people who have a low-bandwidth internet connection. Alt text should consider the context of the image, not just its content. The presence of alt attributes helps support navigability in screen readers, markup validation, and search engine optimization. For more information, see alt attribute. However, if the image is decorative (not informative) or it’s provided only as a visual aid for information that is already expressed in text, then provide empty alternative text (alt="") so it’s ignored by assistive technologies. Examples of decorative images include the following:
A screenshot of the UI showing a user how to fill out fields. Icons in the UI. Images whose purpose is to make the page more visually appealing.
When using the img element, the alt attribute is required, even if its assigned value is an empty string (alt=""). If you exclude the alt attribute completely, then screen readers might instead read the filename aloud. As per the HTML specification, “the most general rule to consider when writing alternative text is the following: the intent is that replacing every image with the text of its alt attribute does not change the meaning of the page.” So if the alternative text is redundant with surrounding text or it’s not useful to visually impaired readers, use the empty tag. Consider the following when writing alt text:
Don’t include phrases like Image of or Photo of. Include punctuation. When screen readers encounter punctuation, they pause before continuing. Use consistent alt text for repeated instances of an image, such as controls, status indicators, or icons that appear multiple times in your document. When possible, avoid using all-caps in alt text. Some screen readers read capital letters as each letter individually. Introduce diagrams in the text, not in the alt text. Don’t use figure captions to replace alt text. Use full sentences or a noun phrase. Recommended: alt=“Architecture of an app that’s built with Apps Script.” Recommended: alt=“A card message.” Write short, descriptive alt text in 155 characters or less. If the image presents more useful information than you can fit in the 155 character limit, include a brief summary of the image in the altattribute and also include a more extensive description of the image in the text. Alt text should consider the context of the image, not just its content.
Figure captions Figure captions are concise and comprehensive summaries of a figure or image. Figure captions (and figure numbers) are optional. When using the figcaption element, you must wrap both the figcaption and img elements in the figure element to ensure that the figure caption is properly associated with the image. Consider the following when writing figure captions:
Figure numbers are optional. If you use figure numbers, use the form “Figure NUMBER. DESCRIPTION.” Recommended: Figure 1. Application capabilities are separated into bounded contexts that migrate to services. Recommended: Application capabilities are separated into bounded contexts that migrate to services. Not recommended: Bounded contexts We recommend using complete sentences in figure captions. Always use end punctuation for captions. When you refer to a figure, don’t use spatial descriptions such as “the image above.”
If you used figure numbers, consistently refer to the figure by number. For example: “… as shown in figure 1.” Don’t capitalize the word figure in a reference to a figure, except at the start of a sentence. If you can’t use figure numbers, show the figure again, for accessibility and user experience reasons.
Don’t include the figure caption in a sentence referencing the figure.
Figure descriptions A figure description is text that provides a more detailed explanation of information represented by a figure. In other words, the information that is conveyed in the image is captured in the text. Any new information should be conveyed through text and not introduced in a figure or image. Consider the following when writing figure descriptions:
Create text that conveys the same information as the figure. Use when a figure caption doesn’t convey the purpose or complete information of the figure. Use punctuation in figure descriptions.
Text in figures In most cases, avoid embedding explanatory text in screenshot graphics; text that’s incorporated into a graphic hurts accessibility and searchability, and increases localization costs if figures are localized. If you must embed text in an image, then be sure to also provide the same information in a form that people with visual disabilities can use, such as a figure description. When you must include text in figures and images, use the following guidelines:
Keep text brief. Avoid complete sentences and punctuation when possible. Don’t embed figure descriptions or captions in the figure or image. Instead, put figure descriptions and captions in text following the figure. Don’t create new abbreviations to condense text. Use sentence case. Follow guidelines for capitalization for titles and headings. Use numbered callouts in figures to help you write a figure description, but don’t use callouts for detailed annotations in the image. Use full trademarked product names.
Accessibility resources
For more information about the accessibility of diagrams and screenshots, see the following resources:
Web Content Accessibility Guidelines (WCAG) General text alternative guidelines from WCAG Using alt attributes for img elements Providing a long description in text near the non-text content Complex images\n\nHowever, if the image is decorative (not informative) or it’s provided only as a visual aid for information that is already expressed in text, then provide empty alternative text (alt="") so it’s ignored by assistive technologies. Examples of decorative images include the following:\n\n- A screenshot of the UI showing a user how to fill out fields.\n- Icons in the UI.\n- Images whose purpose is to make the page more visually appealing.\n\nWhen using the img element, the alt attribute is required, even if its assigned value is an empty string (alt=""). If you exclude the alt attribute completely, then screen readers might instead read the filename aloud.\n\nAs per the HTML specification, “the most general rule to consider when writing alternative text is the following: the intent is that replacing every image with the text of its alt attribute does not change the meaning of the page.” So if the alternative text is redundant with surrounding text or it’s not useful to visually impaired readers, use the empty tag.\n\nConsider the following when writing alt text:\n\n- Don’t include phrases like Image of or Photo of.\n- Include punctuation. When screen readers encounter punctuation, they pause before continuing.\n- Use consistent alt text for repeated instances of an image, such as controls, status indicators, or icons that appear multiple times in your document.\n- When possible, avoid using all-caps in alt text. Some screen readers read capital letters as each letter individually.\n- Introduce diagrams in the text, not in the alt text.\n- Don’t use figure captions to replace alt text.\n- Use full sentences or a noun phrase. Recommended: alt=“Architecture of an app that’s built with Apps Script.” Recommended: alt=“A card message."\n- Write short, descriptive alt text in 155 characters or less.\n- If the image presents more useful information than you can fit in the 155 character limit, include a brief summary of the image in the altattribute and also include a more extensive description of the image in the text.\n- Alt text should consider the context of the image, not just its content.\n\nUse full sentences or a noun phrase.\n\nRecommended: alt=“Architecture of an app that’s built with Apps Script."\n\nRecommended: alt=“A card message."\n\n\n### Figure captions\n\nFigure captions are concise and comprehensive summaries of a figure or image. Figure captions (and figure numbers) are optional. When using the figcaption element, you must wrap both the figcaption and img elements in the figure element to ensure that the figure caption is properly associated with the image.\n\nConsider the following when writing figure captions:\n\n- Figure numbers are optional. If you use figure numbers, use the form “Figure NUMBER. DESCRIPTION.” Recommended: Figure 1. Application capabilities are separated into bounded contexts that migrate to services. Recommended: Application capabilities are separated into bounded contexts that migrate to services. Not recommended: Bounded contexts\n- We recommend using complete sentences in figure captions.\n- Always use end punctuation for captions.\n- When you refer to a figure, don’t use spatial descriptions such as “the image above.”
If you used figure numbers, consistently refer to the figure by number. For example:
“… as shown in figure 1.” Don’t capitalize the word figure in a reference to a figure,
except at the start of a sentence.
If you can’t use figure numbers, show the figure again, for accessibility and user experience
reasons.\n- If you used figure numbers, consistently refer to the figure by number. For example:
“… as shown in figure 1.” Don’t capitalize the word figure in a reference to a figure,
except at the start of a sentence.\n- If you can’t use figure numbers, show the figure again, for accessibility and user experience
reasons.\n- Don’t include the figure caption in a sentence referencing the
figure.\n\nFigure numbers are optional. If you use figure numbers, use the form “Figure
NUMBER. DESCRIPTION."\n\nRecommended: Figure 1. Application
capabilities are separated into bounded contexts that migrate to services.\n\nRecommended: Application
capabilities are separated into bounded contexts that migrate to services.\n\nNot recommended: Bounded contexts\n\nWhen you refer to a figure, don’t use spatial descriptions such as “the image above."\n\n- If you used figure numbers, consistently refer to the figure by number. For example:
“… as shown in figure 1.” Don’t capitalize the word figure in a reference to a figure,
except at the start of a sentence.\n- If you can’t use figure numbers, show the figure again, for accessibility and user experience
reasons.\n\n\n### Figure descriptions\n\nA figure description is text that provides a more detailed explanation of information
represented by a figure. In other words, the information that is conveyed in the image is captured
in the text. Any new information should be conveyed through text and not introduced in
a figure or image.\n\nConsider the following when writing figure descriptions:\n\n- Create text that conveys the same information as the figure.\n- Use when a figure caption doesn’t convey the purpose or complete information of the figure.\n- Use punctuation in figure descriptions.\n\n\n### Text in figures\n\nIn most cases, avoid embedding explanatory text in screenshot graphics; text
that’s incorporated into a graphic hurts accessibility and searchability, and
increases localization costs if figures are localized. If you must embed text in
an image, then be sure to also provide the same information in a form that
people with visual disabilities can use, such as a figure description.\n\nWhen you must include text in figures and images, use the following
guidelines:\n\n- Keep text brief. Avoid complete sentences and punctuation when
possible.\n- Don’t embed figure descriptions or captions in the figure or image.
Instead, put figure descriptions and captions in text following the figure.\n- Don’t create new abbreviations to condense text.\n- Use sentence case. Follow guidelines for capitalization
for titles and headings.\n- Use numbered callouts in figures to help you write a figure description,
but don’t use callouts for detailed annotations in the image.\n- Use full trademarked product names.\n\nUse full trademarked product names.\n\n\n### Accessibility resources\n\nFor more information about the accessibility of diagrams and screenshots, see the following
resources:\n\n- Web Content Accessibility Guidelines (WCAG)\n- General text alternative guidelines from WCAG\n- Using alt attributes for img elements\n- Providing a long description in text near the non-text content\n- Complex images\n\n\n## High-resolution images\n\nModern browsers can use high-resolution images if they are available; this
makes the images look better on high-resolution displays.\n\nTo provide a high-resolution image, use the img
element’s srcset attribute in addition to the standard
src attribute. The srcset attribute lets you specify
different image assets for different screen resolutions. It accepts a
comma-delimited set of image URLs, with the target screen resolution specified
by a size qualifier: 1x meaning the “standard” resolution,
2x meaning “double” the resolution, and so on.\n\nIf a web browser supports the srcset attribute, it selects an
image from the specified images that’s an appropriate resolution for the current
display. If the browser doesn’t support the srcset attribute, it
uses the image in the src attribute. Consequently, you must always
still include the src attribute.\n\nFor example, to provide both a standard resolution image and a
double-resolution image, add a srcset attribute and specify both
1x and 2x image assets:\n\n\n<img src="/assets/images/skateboard.png" srcset="/assets/images/skateboard.png 1x, /assets/images/skateboard_2x.png 2x" width="375" alt="" />\n\n\n- The width attribute matches the CSS pixel size used for the
page dimensions. (The height is automatically calculated based on the width and
the image’s proportions; don’t state it explicitly.)\n- Set the src attribute to point to the standard-resolution
(1x) image, not the 2x version. (Almost
everyone who has a high-resolution screen also has a modern browser that can
recognize the srcset attribute. The src attribute is
mainly used by older browsers on low-resolution devices, which should download
the smaller, low-resolution image.) Even if your original image is the
higher-resolution image, set the src attribute to use the
standard-resolution version; don’t force a reader using a low-resolution screen
to download a graphic that’s higher-resolution than they can view.\n- The filename for the double-resolution image (in this case,
skateboard_2x.png) can be anything—it’s the " 2x”
value following the filename that informs the browser which resolution the file
is. But it’s a good idea to use a filename of the form
BASENAME_2x.EXTENSION to make clear to human
readers that it’s a double-resolution version of
BASENAME.EXTENSION.\n- The double-resolution image must be exactly twice the width and height of
the standard image, give or take a pixel. (For example, it’s okay for the
double-resolution image to be 875x500 and the standard size to be 438x250.)\n- Don’t scale up an existing 1x image to make the
2x version. If all you have is the 1x version, then
use it alone. But if you’re starting with a high-resolution image (at
2x resolution or better), then you can scale it down to appropriate
dimensions for 1x and 2x.\n- Currently, only an additional 2x image is necessary, but
someday screen PPI may increase further.
So the srcset attribute supports further alternative sizes, each
specified by the appropriate multiplier, such as 3x or
4x.\n- A browser that supports the srcset attribute uses only the
images provided in that attribute—it ignores the src attribute. So
specify all available image resolutions in the srcset
attribute.\n\nFor more information, see the HTML specification for the img
element.\n\n\n## Layout of images on a page\n\nConsider the following guidelines for adding images to pages:\n\n- Don’t try to place an image manually; for example, don’t use a
style attribute or other workarounds to control the image’s
left/right justification or the margins around the image. Instead, use
your site’s standard CSS image styles.\n- Don’t make your image too small. It’s fine for an image to take up the
full width of a page.\n- Consider how the image will look when printed out.\n- In general, don’t use an image that’s wider than the column it appears
in. On developer.android.com, for
example, the main-body column is 856px wide, so use images that are no wider
than that. In that context, the high-resolution 2x version of the image should
be no wider than 1712px.
Screenshots at full resolution often take up too much space on the page, so you may have to resize them. If the graphics were created by someone else (for example, a designer on the team you’re supporting), it may be fairly trivial for them to provide you with images at the appropriate size. If the images they provide are wider than 856px, ask the designer if they can provide the relevant graphics as 856px/1712px pairs.\n- Screenshots at full resolution often take up too much space on the page, so you may have to resize them.\n- If the graphics were created by someone else (for example, a designer on the team you’re supporting), it may be fairly trivial for them to provide you with images at the appropriate size. If the images they provide are wider than 856px, ask the designer if they can provide the relevant graphics as 856px/1712px pairs.\n- Don’t link to the figure from within the same page unless it’s a very long page and you’re linking to it from quite far away on the page.\n- Don’t center the image on the page.\n- Don’t put an img element inside a p element.\n\nIn general, don’t use an image that’s wider than the column it appears in. On developer.android.com, for example, the main-body column is 856px wide, so use images that are no wider than that. In that context, the high-resolution 2x version of the image should be no wider than 1712px.\n\n- Screenshots at full resolution often take up too much space on the page, so you may have to resize them.\n- If the graphics were created by someone else (for example, a designer on the team you’re supporting), it may be fairly trivial for them to provide you with images at the appropriate size. If the images they provide are wider than 856px, ask the designer if they can provide the relevant graphics as 856px/1712px pairs.\n